
Mastering Views in Airtable: A Clever Trick
Airtable has an array of dynamic features, but the views are its heart and soul. They provide the flexibility and power to manage data more effectively than standard spreadsheet tools like Google Sheets and Excel. However, they can become overwhelming and challenging to navigate, especially when you’ve got a significant number of views to manage.
Enter the clever little trick, which is about making views effortlessly manageable and, dare we say, slick. This method involves making the most out of Airtable’s unique view links and presenting them in a visually appealing and easily accessible manner.
The Basics
Before diving into the details, let’s recap the basics. Your Airtable views all have a unique URL. Click on a view, and look at the URL in your browser – it’s mainly identical, except for the section starting with ‘VI’. These unique links can be saved, turned into bookmarks, and used to launch specific views easily.

Despite these benefits, if you have a large number of views, even with the ability to create sections for organization, it might become challenging to find a specific view. This is where our slick trick comes into play.
Getting Organized
As a set-up example, let’s say you’re managing multiple group classes, and for each class, you have several tasks to accomplish throughout the day. One approach would be to display all tasks in a single view, but this can be overwhelming. So, to keep your interface simple and uncluttered, creating separate views for each set of related tasks can be more beneficial.
Here’s how the process unfolds:
- Copy the unique URL for a view.
- Create a new table in Airtable where you can record these links. You can name these links according to what they represent, for example, “After Check-in”, “Verify Payments”, etc.

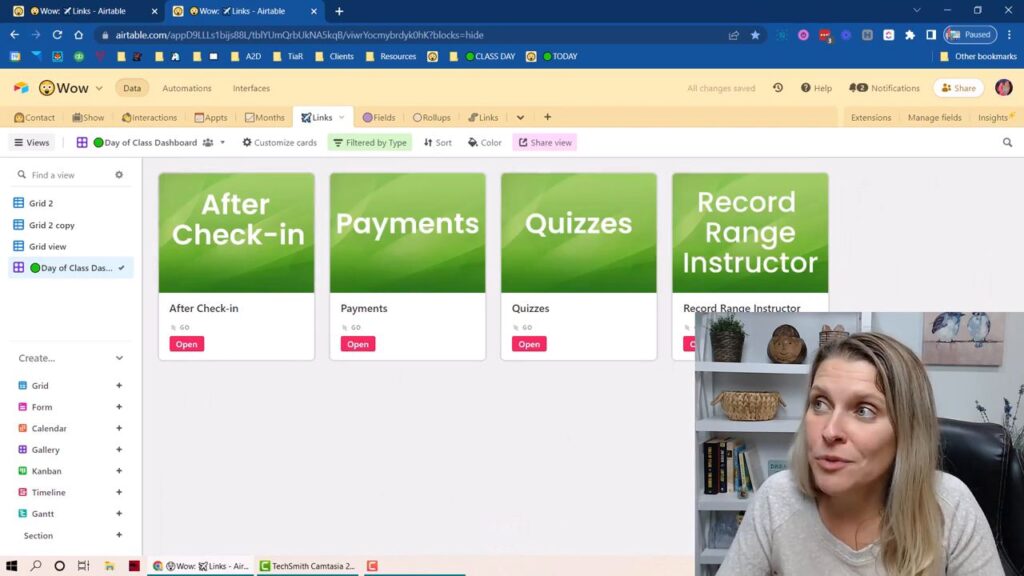
At this point, your new table will look like this (shown with four views for simplicity):
Creating a Gallery of Views
To simplify things further and make your views more visually appealing, consider implementing the gallery view. The gallery view displays each link as a card, providing a handy, aesthetically pleasing dashboard.

Another benefit of the gallery view is the flexibility it provides. You can theme your cards with brand colors, use cover images using the ‘attachment field type’, or even include notes or directions related to a specific task view in the “Notes purpose” field.
The Finished Product
Using this technique, you end up with an automatically filtered gallery of task-specific views. No longer do you need to scroll endlessly to find a particular view. Despite having around 100 views, you can simply navigate to your dashboard to see the correct view in an instant. The end product doesn’t just look cool, but it also significantly enhances your productivity.
“This technique doesn’t just revamp the way you manage your views, but it also provides an easy-to-navigate homepage for your daily tasks in Airtable.”
Extra Tip: Sharing Views
This trick comes in handy particularly when sharing views. To share multiple views with others, rather than distributing individual links, you can share a link to your entire gallery dashboard. A bonus advantage here is that you can impress colleagues or clients with a visually outstanding and organized data management system.

In conclusion, by using unique URLs in Airtable, creating a dedicated table, and arranging them in a gallery view, managing multiple views becomes a breeze. Not only does it keep views organized, but it also aids in quickly finding what you’re looking for—a win-win for all Airtable users.
“In the world of data management, time is money, and small tweaks like this can considerably improve how you use Airtable, saving you both time and money.”
So, go ahead and experiment with this technique, and don’t forget to share potential use cases for these methods in your business.
Entire Video Transcript: Airtable Tricks and Tips – Power Up Your Workflows by Organizing Your Airtable Views
Discover a clever, easy-to-use trick to streamline your Airtable views and manage them better! Learn how unique links for each view can change the game for you. Tune in and simplify your tasks!
Introduction
Okay. I love this clever little trick because it’s really easy to implement and it looks really slick. So basically it’s about making views easier to manage because really the views are where a lot of the power of Airtable is. You know, if you make an Excel Sheet or a Google Sheet, it’s hard for you to just filter out things or hide columns, rearrange columns, put them in different orders. It’s really hard to do that with Google Sheets and with Excel, but it’s so easy to do that with Airtable.
Using Views in Airtable
And so the power really becomes that you figure out what types of views that you need and you save them and then you just have that particular view that makes that kind of task easier for you. Already ready to go when you need it. But if you’re anything like me, basically I have so many views and it sometimes is like I’m scrolling forever and then it’s like, I know it’s here, I know it’s here. I know the one that I use for when I’m scheduling new dates. I know it’s here and it’s hard to see it in the clutter.
I do do a great job of organizing them, but even still I feel like sometimes they’re hard to see. So I’m going to show you a really slick way of making your views a little more accessible. It looks really good. So basically it is important that you know, if you didn’t already know, that each view has a unique link. Like if you click on this view and you inspect what the URL is, it will be different starting at this last part where that starts with the VI.
And then basically so if I click here, this is mostly the same, but it’s a little bit different starting right here. So each of those views has unique links. So if you bookmark or save that link, it makes it easy to get back to that particular view. I love having sections. It’s worth it to me to have a pro plan so I can have those darn sections because I really do enjoy having them.
So I can create sections and I can create good organization for keeping my views somewhat organized. But it’s not uncommon for me to have seriously like probably 100 views. And even with that organization, it’s sometimes just hard to find what I’m looking for. It’s like I know it’s right in front of me, but I just don’t see it. So basically if you had I’m going to use as a use case.
Creating a View Gallery
Like something that’s kind of that I’m used to is like I have group classes so people are there in person and I have certain tasks that need done at different times during the day. Now I did try at one point to just have one view set up. That was like today’s appointment and I was showing all the columns for all the things that would have to happen during that particular day, but my brain didn’t like it. My brain was like, I just want to see after check in, you got to do three things and I just want to see those three columns. So you can say these are the students that are here and then do those things in those three columns.
And then for the next thing that I want to see or do, I can just go to that particular view. So my brain really likes the simplicity of when I’m trying to do something, only showing myself the three or so columns that matter instead of trying to multipurpose. One view for today’s appointments. Now of course it matters on how much stuff there is that you’re tracking. I have about seven views, I think seven or eight that are for that day’s appointments things that I’m doing.
I have one view that’s just showing me what everyone said about their referral information because I want to analyze that stuff and drill into it and acknowledge it. If someone’s there and they put a person’s name down as having referred them, I like to acknowledge that to them in conversation during the day.
I have certain views to go and do these things and that’s how I want to keep it. I want to have seven views that I have to use during the course of that day. So basically what I’m going to show you is that if you go and you get let me expand this. I’m keeping it at four just to keep it simple. I didn’t recreate all the different things that I would do, but my right after check in one, if I get this, I copy and paste this and I go and record it in this table.
So I pasted it here and I gave it the name like after check in, then I would go back to here and I would get the unique URL and I would come back into here and I would paste it here and I would say this is for where I verify payments. All of this stuff are for those four views. Then in this button right here and it can be whatever color. Like if you have a certain brand color you kind of want to go with or whatever, it can be any color that you like.
Example of a View Gallery
Basically I also used Canva and I just created a cover image. So you want to use the three to two. So I did a 600 by 400 cover image there and it’s just an attachment field whoops I didn’t clicked off. It’s just an attachment field type. And then this is like more of you just for your own purpose of figuring out how to organize and categorize these things internally that make sense to you and will make it easy to create views on what matters. So that’s kind of not really copyable, that’s more of you got to figure out what works for you.
But saying whether it’s a shared view. So notice how these ones have the share the SHR part versus these ones. If I give this to someone who is not a user in my Airtable, and they don’t have my username and password, and they try to use this link, they’re not going to be able to see anything. So there is a difference between it being a shared view versus being like an internal purpose for logged in users. And so basically, I want to create a beautiful gallery.
So this is the gallery view. Doesn’t that look slick? It looks so good. And so basically, I’m going to make this my day of class gallery. And so I’m going to come up here and I’m going to filter, and I’m going to add the condition.
Alternative View Gallery
And this is where that type comes into play. I can say where type is day of class workflow. So I would have the seven or eight cards right here and it looks so good. Now if you don’t want to take the time to go make images in canva and drag them into here and all that, you don’t have to have cover images. You could just have it like this, really simple.
And also if you wanted to include like directions, you could have directions here, so you’d have to type them. I just called it Notes purpose. And you could say directions to yourself. Like, one, go do this thing and then two, go do that. And you could have those all typed up there.
So when you go into this, you see those notes to yourself or instructions for your team members or whatever, warnings and alerts and all that kind of stuff. Okay, so I hope you think that looks as cool as I think it looks. I think it looks pretty darn slick. I like it better with not the extra stuff there. I think it looks real nice and clean this way.
Bookmarking a View Gallery
All right, so that’s kind of the first use case. It’s like to make it easier for you to find, like, you could have multiples of these set up and now you would just bookmark this address. So that’s what I’ve done is I’ve just called it today. So like on a class day, if I just go to this one link, it’s not like this is the folder drop down. Now I just have to go to this and I get a beautiful dashboard that has all of those other links that were right here without me having to scroll and dig for them.
Okay. All right, so now we’re going to talk about a similar but different type of purpose of this table. So when you share links with someone, I kind of feel like it feels hard to get down in there. Like if they need that link again, or if you want to share it with a new team member on your team, like, oh, we have someone now new that we have to share this link with. It can be, I don’t know, because first off, it’s like I got all my views.
And so I come in and it’s like, where is it? I swear it’s here. I know it’s right in front of me. Where is it? Right, so that’s one problem.
And I’m going to use these ones over here. I’m just going to pretend that this is like all of our contacts, and these are contacts that belong to this person. And I have group one, group two, group three, and I want to have those as shared views. So I do want you to know that you can add descriptions. You have to go up here to add the descriptions.
You can edit the description of it right here and you can say stuff like that. But look, you can’t see all of it. And so it kind of cuts off and you can’t fit that much there. Also, it makes it taller, so it eats up more real estate and my views scrolling, so I kind of don’t like that. So I’d actually prefer not to have the view description there telling me who I’ve shared it with or anything like that.
I would rather over here in this link, let me go back. So I just created a view that would let me kind of differentiate just the shared ones here. So for these ones that are shared, I would like to have notes here that kind of tell me who I shared it with and when and all of that. And I can just kind of have a running log and keep adding to that so I have a lot more space because this is just a long text field. So I can have a lot of space here to keep a log.
Because sometimes I feel like I create shared views and then I’m like, do I still need this? I feel like I don’t need it. Do I share it with anyone? Is it okay to delete this? Right?
So if I kind of can come in here and I can look at the notes, if I’ve been good and diligent about keeping those kinds of notes, and you can create the same sort of thing. So I’ll just go ahead and I’ll duplicate this and then I will say like, class list for this is what I’m going to share with my instructors. Or something like this, I don’t know. But I would come here and I would say where type is, and I would say class list.
Sharing Multiple Views
Okay, so now instead of sharing all these individual links with the person, I could give them all of them right here.
Oh, it’s this one. Give them all of them right here. And then I could come and create a shared link for this dashboard. So I copy and paste this. Now if I open up an incognito window, the person can get to this beautiful dashboard and all of these links work because they’re shared links.
So it’s kind of nifty because A, it gives you the ability to share multiple shared views by giving one shared link, and two, it just is a more impressive way of sharing those with people. Okay, I hope you found that as cool as I find it. Let me know what use cases you might have for this in your business.


